In the revolution that allows the public to control the powerful functions of the PC, Raspberry Pi is the core, providing us with an easy-to-use platform with extensive ecological support. Although the platform is intuitive and easy to use, engineers and beginners can still benefit from some tips provided by users who have used Pi.
"10 Things to Know" will not cover everything, and the online forum will provide continuous support for this. These valuable information may not be found in any guide or tutorial, but they are hard-won experience summaries. This includes opinions and suggestions on choosing and formatting the SD card, choosing the power supply for the Raspberry Pi, choosing the correct Wi-Fi adapter, programming skills, operating instructions when the system freezes, and how to properly power it to avoid damage.
A quick review of these tips can greatly enhance the first-time experience of Raspberry Pi and fully experience the powerful functions of the single-board computer platform.
1: When and under what circumstances to use Raspberry PiThe price, performance, and support community behind Raspberry Pi make it almost impossible to reject the product when you start all possible tasks. Essentially, the Raspberry Pi is a personal computer. Take Raspberry Pi 3 Model B of Raspberry Pi Foundation as an example. This product is based on ARM® Cortex®-A53 up to 1.2 GHz. And with 1 GB RAM, 802.11n wireless LAN, Bluetooth 4.1 and Bluetooth low energy, 4 USB ports, 40 GPIO pins, complete HDMI port, Ethernet, 3.5 mm audio jack and camera and display interface.
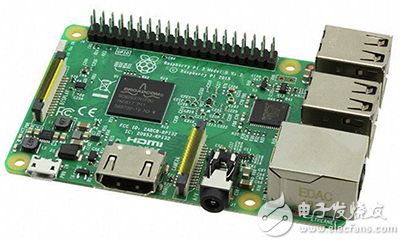
Figure 1: The Raspberry Pi 3 Model B of the Raspberry Pi Foundation is based on an ARM Cortex-A53 up to 1.2 GHz and has 1 GB of memory and an 802.11n wireless LAN connection. (Image source: Raspberry Pi Foundation)
From the mechatronics system that reads temperature sensors, controls motors and pistons, to be a full-featured computer, the product is almost omnipotent. It can also perform some interesting projects including video processing, robots and remote 3D printer control.
2: Start running Raspberry PiRaspberry Pi is designed to run an operating system, not just write code on bare metal. The most common operating system is a special Linux version style called Raspbian (a hybrid of Raspberry and Debian). Of course, other operating systems can be run, but beginners should stick to Raspbian.
When the Raspberry Pi is used as a standalone computer, all traditional peripherals will be required, including a mouse, keyboard, SD card (Class 10, at least 8 GB, such as AP8GMCSH10U1-B from Apacer Memory America) and a monitor.
An external SD card reader is required to first copy the Pi image from a separate computer to the SD card. After the image is copied to the SD card, all other tasks can be done on the Pi. A good SD card reader is the DA-70310-2 USB 2.0 reader from Assmann WSW Components, which is suitable for almost all mainstream memory card formats.
To format the SD card, please obtain the SD Card Formatter software from the SD Association through the link on the Raspberry Pi webpage. Use only verified software to ensure that NOOBS is successfully installed on the SD card. Or buy an SD card with NOOBS pre-installed, such as a Raspberry Pi NOOBS 16 GB card.
Choose a wireless keyboard and mouse (such as Adafruit's 1738) to free up the USB port and avoid cable entanglement. Or use a powered USB 2.0 hub, such as Tripp Lite's 4-port U22-004-RA. In fact, a 4-port power-on hub is more recommended because it can reduce the power requirements of the Pi.
If you plan to connect to the Pi remotely via SSH, or use it with a touch screen, the user no longer needs a mouse, keyboard, and monitor (see Tip 9).
In addition, unless the monitor has an HDMI input, you need to use an adapter to connect the Pi's HDMI port to the monitor's input. For example, when bridging HDMI to a monitor with a DVI-D port, you can use CnC Tech's 741-20010-00300 (Figure 2).
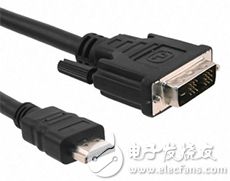
Figure 2: An adapter may be needed to connect the HDMI output of the Raspberry Pi to the monitor, such as CnC Tech’s 741-20010-00300 HDMI 19-pin to DVI-D 19-pin male adapter. (Image source: CnC Tech)
Later, when the Pi is embedded in a system or project, these peripherals may be put aside.
3: Get proper powerDo not supply power to the Raspberry Pi through the USB port of the computer, as they do not have the power surplus required to prevent damage to the SD card, freezing of the Raspberry Pi, and other sporadic power-related issues. Generally, a 2 amp power supply can meet the needs of Raspberry Pi 3, but a 2.5 amp power supply is recommended.
Many high current power supplies have a tubular male output connector. Use Adafruit's 2727 jack to Micro USB A plug cable adapter, with any 5 V, center positive 5.5 x 2.1 mm pole power supply, and connect it to the Raspberry Pi 3 (Figure 3).
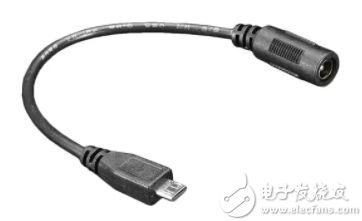
Figure 3: To supply power to the Raspberry Pi according to the 2.5 A recommended value, Adafruit’s 2727 jack to Micro USB A cable adapter should be combined with any 5 V, center positive 5.5×2.1 mm pole power supply. (Image source: Adafruit)
The Raspberry Pi itself does not need to use all the current. Use a power supply with sufficient additional load capacity to ensure that the input voltage will not drop when other electronic components and accessories are connected to the circuit board. Based on this, let's take a look at the general power requirements.
Depending on the model, the Raspberry Pi consumes approximately 100 mA to 300 mA in idle mode, and each successive iteration of the Pi will consume more current (Figure 4). If the application requires ultra-low power consumption, this factor should be considered in the Raspberry Pi selection process.
Please note that if the Pi uses mobile work, it may not be able to get enough current, causing most USB mobile power supplies to fail to turn on due to their internal circuit settings. Please use Adafruit's 4000 mAh Model 1565 or 10,000 mAh Model 1566 battery packs, which have been confirmed to work with Pi.
4: Obtain or make a USB cable with a built-in on/off buttonRaspberry Pi does not have an onboard reset button or power switch. To avoid unplugging and replugging the USB cable every time the board freezes and needs to be reset, use a USB cable with a built-in on/off button, such as Adafruit's 2379. This demand is summarized in continuous experimentation and learning. Beginners will inevitably lock the system during the learning process. Using buttons is easier than using cables and connectors, which reduces the burden and avoids unnecessary wear of the USB connector.
However, please note: In general, do not turn off the Raspberry Pi by default using the on/off button. Direct power off will damage the SD card, so be sure to follow the correct shutdown procedure (see "Switch position").
5: The key to success: Raspberry Pi accessory boardRaspberry Pi is a powerful single board computer, but it is not a panacea. Fortunately, there are a large number of available accessory boards to enhance Pi's functionality.
For example, although Raspberry Pi does not have an on-board analog-to-digital converter (ADC) for data acquisition, there are several converter solutions to choose from. The 103990060 ADC and digital-to-analog converter (DAC) board specially built by Seeed Technology is a good solution (Figure 5).
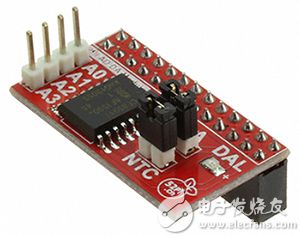
Figure 5: Seeed Technology's 103990060 Raspberry Pi expansion board provides 8-bit ADC and DAC functions for Raspberry Pi. (Image source: Seeed Technology)
Another way to equip the RasPi with ADC input is to leave this work to a small Arduino board, such as Adafruit 3.3 Volt Trinket.
To do this, first review the "10 things you need to know before starting an Arduino project", and then use simple sketches to program the board to collect analog data. The data is relayed to the Pi via the serial connection.
A more convenient way is to use a custom Arduino board that can be used with Raspberry Pi, such as Seeed's AlaMode and DFRobot's DFR0327 expansion board.
Tasks that need to be executed in real time will undoubtedly require an accessory board, because Raspian does not have this feature. Raspbian/Linux will allocate CPU time to applications, Python code, and Raspbian itself as needed. The unpredictability of this resource reallocation makes real-time execution impossible.
6: Wi-Fi dongleThe easiest way to install updates and applications on the Pi is to connect to the Internet via Wi-Fi. Raspberry Pi 3 has this feature built in (802.11n). However, other versions of Raspberry Pi do not have Wi-Fi, so you may need to purchase a Wi-Fi dongle. In this case, necessary research should be done to ensure that it can be recognized by the Raspbian operating system. Adafruit's small 814 802.11/b/g/n module is a great and proven dongle for Raspberry Pi (Figure 6).
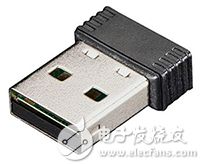
Figure 6: If your Raspberry Pi board does not have built-in Wi-Fi, please research and find a suitable dongle, such as the Adafruit 814 USB adapter that is known to work with Raspbian. (Image source: Adafruit)
7: Pay attention to the output logic level and drive capabilityRaspberry Pi uses 3.3 V logic levels. This is a small but important detail that is often overlooked. The 3.3 V logic level means that the Pi may not work with many devices and accessories that require a 5 V logic level. In addition, if the total current does not exceed about 50 mA, the drive current on each pin is 16 mA. Using SparkFun's BOB-12009 bidirectional converter and other logic level converters can easily solve this problem.
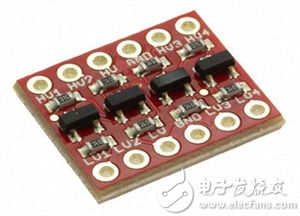
Figure 7: SparkFun's BOB-12009 converts the 5 V signal to the 3.3 V required by the Raspberry Pi. (Image source: SparkFun)
8: Python programming languagePython is the default programming language of Raspbian. In fact, the Raspbian image is pre-loaded with the Python development environment IDLE (Integrated Development and Learning Environment). For most Pi projects, using Python is indispensable.
In Raspbian, you can choose to use IDLE 2 to run Python 2 or IDLE 3 to run Python 3. Continue to use IDLE 3/Python 3 to stay up to date and get the latest documentation.
Please note that Python 2 and 3 codes are not directly interchangeable. There is currently a lot of Python 2 code, so you might want to be able to return from Python 3 to Python 2, but there are some differences between the two in terms of syntax and naming conventions, and they are not directly compatible. However, if you decide to change, you can double-check the code and make the necessary changes to convert Python 2 code to Python 3, and vice versa.
The fastest way to start building a personalized GUI for Python programs is to use a set of tools called TkInter, which is bundled with Raspbian. TkInter has many short online tutorials to help users get started quickly.
For novice programmers, it is recommended to break the project into basic building blocks. For example, the project involves output to LCD, reading sensors connected to SPI, and obtaining user input from three buttons. A separate code segment should be written for each task. Writing all the code at once may cause errors and make debugging more difficult.
9: Screen sizePlease use the large display when programming, instead of the small 3-inch display that is hard to read on the Pi. Although very suitable for the final customized interface of the project, it is best to use a full-size display or even a 7-inch touch screen, such as the Raspberry Pi Foundation's 8997466 LCD (Figure 8). Depending on the Raspberry Pi model used, the display may not be automatically detected through the DSI connector. If the Pi model requires manual activation of the screen, this procedure is documented in the Github documentation.
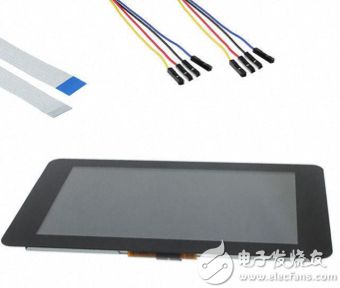
Figure 8: Avoid using a small 3-inch display because it is difficult to read. Instead, choose a full-size monitor or a 7-inch 8997466 LCD monitor from Raspberry Pi Foundation. (Image source: Raspberry Pi Foundation)
10: Tips and remediesYou may wish to use an SD card larger than 32 GB. In this case, make sure to format the card as FAT32 file system. Raspberry Pi can only read FAT32 volumes.
Make sure that the SD card is compatible with Raspberry Pi.
If stuck on the command line, run the command "sudo start x" to start the GUI.
Raspberry Pi GPIO pins are not marked. To avoid confusion, please get a GPIO reference, such as this pin reference provided by Seeed.
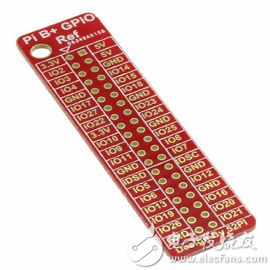
Figure 9: Use the pin reference at hand to identify the Raspberry Pi GPIO pins. (Image source: Seeed Technology)
Do not supply power to the Raspberry Pi through the GPIO pins. Although power can be achieved, this means bypassing the on-board fuse. The fuse is self-resetting and can be replaced as needed. If the power supply is powered by GPIO, the Pi is probably damaged when it makes a popping sound.
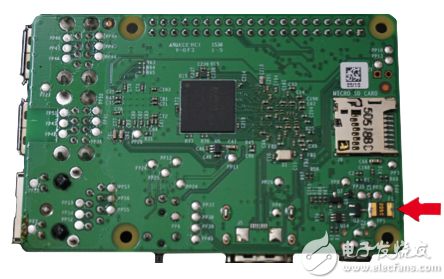
Figure 10: If the user chooses to supply power via GPIO, the self-resetting fuse (red arrow) on the Raspberry Pi 3 will be bypassed. This puts the board at risk. (Image source: Digi-Key Electronics)
If you use Raspberry Pi for development, please backup all files. The image on the SD card may be damaged at some point, making the data unrecoverable. Use a USB flash drive as a file storage library to completely avoid risks, such as Apacer's APHA016G2BACG-DTM 16 GB USB drive.
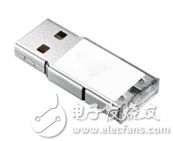
Figure 11: Save the file to the USB drive to protect the file if the file system of the Raspberry Pi is damaged. (Image source: Apacer Memory America)
to sum upRaspberry Pi is known for being powerful, easy to use, and well supported. This product is an excellent foundation for building professional applications or interesting projects. Regardless of your knowledge background and skill level, these skills will shorten the learning curve, speed up time to market, and make the whole process more productive.
Camera Filter,Camera Polarizer Lens,Camera Raw Filter,Lens Filter
Shaoxing Shangyu Kenuo Photographic Equipment Factory , https://www.kernelphoto.com
