
We have to generate four files: Linux requires 4 files to start:
Boot.bin
2. device_tree.dtb
3. uImage
4. uramdisk.image.gz
A1. To generate the boot.bin file: (When generating boot.bin, the following three file sequences cannot be wrong.)
(1) FSBL: The first level starts the boot program, selects the Zynq FSBL template, and generates zynq_fsbl_0.elf
(2) system.bit: hardware bit stream (hardware project file, some named zynq_system_wrapper.bit)
(3) u-boot: u-boot.elf. Linux Bootloader. U-boot is a bootloader program for a variety of embedded CPUs. Architecture: api, arch (u-boot supported cpu architecture, subdirectory arm used by us), board (and related development board related files), common (command supported by u-boot command line), disk , doc, drivers (device drivers supported by u-boot), fs (supported file systems), include (header files, assembly files supported by various hardware platforms, system configuration files, and files supported by the file system). Configs/zynq_common.h is the file related to our development board), lib (architecture related library files), net, tools (generating u-boot tools, for example, mkimage, crc, etc., including Makefile and boards.cfg )
Startup process reference:
A2.device_tree.dtb
Devicetree.dtb: Linux system device tree file, loaded into memory by u-boot. At runtime, the device tree information of the build system hardware is passed to the kernel for system startup. As a dynamic interface between u-boot and the Linux kernel. The introduction of the device tree reduces the kernel's heavy reliance on system hardware and improves code reuse. And accelerated the development of Linux support packages. This allows a single kernel image to support multiple systems, reducing the need for kernel design and compilation by reducing the change in requirements and cost of hardware. Use the Linux kernel configured by the device tree runtime, which allows the same kernel image to run on different hardware configurations (Linux kernel that use device for run-TIme configuraTIon which allows the same kernel image to run on different hardware configuraTIons).
.dts is the format of the device tree source file
a3.uImage
uImage: Linux kernel image, loaded into memory by u-boot. The Linux source code is written in assembly language and C language. It understands the overall distribution of kernel source code and helps to understand how Linux organizes various functions. Arch (hardware architecture, kernel, lib, mm, math-emu, boot), DocumentaTIon, drivers, fs, include, init, ipc (interprocess communication), kernel, lib, mm, net, scripts, block, crypto, Security, sound, usr.
A4.uramdisk.image.gz
Uramdisk.image.gz: Linux file system, loaded into memory via u-boot.
A file system is a method of how to store data on a storage device, including storage layout, file naming, space management, security control, and so on. The Linux operating system supports many modern popular file systems, such as ext2, ext3, and ramdisk.
1. Build a cross-compilation environment
(1) Download online: arm-2013.05-24-arm-none-linux-gnueabi-x86_64-linux-gnu.tar.bz2
(2) Decompression. I directly extract it to /home/ds and extract the path "/home/ds/arm-2013.05"
(3) gedit /etc/environment
PATH="/usr/local/sbin:/usr/local/bin:/usr/sbin:/usr/bin:/sbin:/bin:/usr/games:/usr/local/games"
Comment out (or change directly), add
PATH="/usr/local/sbin:/usr/local/bin:/usr/sbin:/usr/bin:/sbin:/bin:/usr/games:/usr/local/games:/home/ds/ Arm-2013.05/bin"
"/home/ds/arm-2013.05/bin" is based on your version.
This operation allows the user to use arm-none-linux-gnueabi- under root privileges.
(4) gedit /etc/bash.bashrc
Add at the end:
PATH="/usr/local/sbin:/usr/local/bin:/usr/sbin:/usr/bin:/sbin:/bin:/usr/games:/usr/local/games:/home/ds/ Arm-2013.05/bin"
"/home/ds/arm-2013.05/bin" is based on your version.
This operation allows non-root users to use arm-none-linux-gnueabi-
then:
Source /etc/bash.bashrc
Effective immediately
(5) arm-none-linux-gnueabi-gcc -v
Print out the cross compiler version information to prove that the setup system environment is successful.
2. Compile U-Boot
(1) Create a new folder build under /home/ds (you can use mkdir build, you can also add it manually), cd to the build folder
(2) Download "u-boot-xlnx-xilinx-v2015.1.zip" from the Internet, extract it to the build folder, and cd to u-boot-xlnx-xilinx-v2015.1. (The path is now "/home/ds/build/u-boot-xlnx-xilinx-v2015.1")
(3)
Sudo su
Export CROSS_COMPILE=arm-none-linux-gnueabi-
Make zynq_microzed_config
Make / / generated u-boot (an elf file), u-boot.bin, and u-boot.srec in the root directory. The u-boot (an elf file) is used to create the last boot file.
Cp u-boot u-boot.elf //copy it
Then refer to: or Lu Jiahua's "Embedded System Software and Hardware Cooperative Design Combat Guide" Chapter IX, generate the boot.bin file.
3. Compile uImage
(1) Download it online: "linux-xlnx-xilinx-v2015.1.zip", extract it to build, cd to linux-xlnx-xilinx-v2015.1.
(2)
Sudo su
Sudo apt install u-boot-tools
Sudo apt install libncurses5-dev// prevents this library file from being missing from make menuconfig
(3) The compiled target is for the ARM architecture. Because it is for the ARM architecture, you need to use a cross compiler.
Export CROSS_COMPILE=arm-none-linux-gnueabi-
Make ARCH=arm xilinx_zynq_defconfig
Make ARCH=arm menuconfig
Make ARCH=arm UIMAGE_LOADADDR=0x8000 uImage
(6) Print out:
Image Name: Linux-3.18.0-xilinx
Created: Tue Jul 19 16:00:07 2016
Image Type: ARM Linux Kernel Image (uncompressed)
Data Size: 3477600 Bytes = 3396.09 kB = 3.32 MB
Load Address: 00008000
Entry Point: 00008000
Image arch/arm/boot/uImage is ready
4. Create a device tree
(1) (Note that this is the dts file that exists in the linux-xlnx/arch/arm/boot/dts/ directory before the dtb file can be generated. The following is the zedboard example) in the Linux source directory (my is /home) /ds/build/linux-xlnx-xilinx-v2015.1"), compile target "dtbs" will compile all dts files into dtb files, all dts files and generated dtb files are located in linux-xlnx/ Arch/arm/boot/dts/ directory
Cd to linux-xlnx-xilinx-v2015.1
Make ARCH=arm dtbs
Zynq-zed.dtb is the file we need, renamed to devicetree.dtb
If you only want to generate zynq-zed.dtb, enter the following command in the root directory of the Linux source code.
Make ARCH=arm zynq-zed.dtb
Or use the device tree compiler to compile the dts file:
Apt-get install device-tree-compiler
Cd /home/ds/build/linux-xlnx-xilinx-v2015.1/arch/arm/boot/dts
Dtc -O dtb -I dts -o zynq-zed.dtb zynq-zed.dts
——But there is no zynq-microzed.dts file we want, so we can only use other methods. The introduction here is to bring convenience to readers of other development boards.
(2) From step six you can download to microzed_7010_7020_petalinux_SD_images, which has devicetree_microzed_2014_4.dts, which can be generated.
You can also use Vivado to create a Microzed project to generate a bitstream and import it into the SDK. File->New->Board Support Package->Board Support Package OS: device-tree->Finish Command-->In the dialog box that pops up Set the value of bootargs to: console=ttyPS0,115200 root= /dev/ram/ rw earlyprintk—>Select ps7_uart_1 in the Value drop-down menu of the console device and click the OK button. (The bootargs parameter here is the kernel's command line arguments. During the kernel boot phase, these parameters are passed to the kernel. Here root= /dev/ram refers to the kernel booting the filesystem from memory, U-boot will uramdisk.image.gz After loading it into memory and passing its memory address to the kernel, the kernel knows where to run the file system from. But we know that the memory on Zedboard is only 512M, and uramdisk.image.gz can only be up to 32M, then when building What should I do with a larger system? There are two ways to solve this problem. The first one still uses uramdisk.image.gz as the file system, and then it needs to be loaded into the user system file and placed in the FAT partition. After booting, mount the FAT partition to the system and then access it accordingly. The second method is to put the file system into the EXT partition of the SD card. Just like the linaro_ubuntu desktop system started in Chapter 1, the only requirement here is The modification is to change the startup parameter root=/dev/ram here to root=/dev/mmcblk0p2.)——> After compiling, device-tree_bsp_0/ps7_cotexa9_0/libsrc/devic You can see the xilinx.dts file generated in the e-tree_v0_00_x directory. The xilinx.dts here is not perfect. If you use it on Zedboard, you should modify it according to the actual situation. Find the modified xup_zed.dts, which will modify the mdio parameter of ethernet.
Cd ~/build/linux-xup
./scripts/dtc/dtc -I dts -O dtb -o devicetree.dtb xilinx.dts
Of course this process is reversible, you can convert a .dtb to .dts
./scripts/dtc/dtc -I dtb -O dts -o xilinx.dts devicetree.dtb
Or put xilinx.dts in the arch/arm/boot/dts folder and use the following command to generate devicetree.dtb.
Make ARCH=arm xilinx.dtb
Cp arch/arm/boot/dts/xilinx.dtb ./devicetree.dtb
5. Generate uramdisk.image.gz
(1) Download arm_ramdisk.image.gz in +and+Modify+a+Rootfs (the URL also has a procedure)
(2) In the build directory: mkdir filesys, cd filesys, put arm_ramdisk.image.gz in the filesys directory (3) cp arm_ramdisk.image.gz ramdisk.image.gz
(4) gunzip ramdisk.image.gz
(5)mkdir file_tmp
(6) sudo mount ramdisk.image -o loop ./file_tmp/ (or sudo mount -o loop ramdisk.image file_tmp)
(7) At this point the file system has been mounted to the film_tmp directory, you can go to the film_tmp directory to modify the file system accordingly. After the modification, umount the file system and recompress it. Here, if you want to make an EXT file system, you only need to insert the SD card into the PC and copy the contents of the file_tmp folder to the EXT partition of the SD card.
(8) sudo umount file_tmp/
(9) gzip ramdisk.image
(10) sudo apt-get install u-boot-tools
(11)mkimage -A arm -T ramdisk -C gzip -d ramdisk.image.gz uramdisk.image.gz
Output:
Image Name:
Created: Tue Jul 19 17:32:31 2016
Image Type: ARM Linux RAMDisk Image (gzip compressed)
Data Size: 5310073 Bytes = 5185.62 kB = 5.06 MB
Load Address: 00000000
Entry Point: 00000000
6. Another way: direct download
Open Source Linux Images
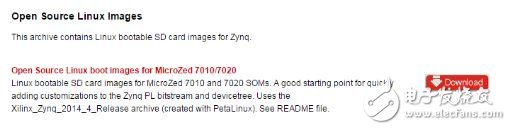
After downloading, choose 7010 or 7020 according to the model of your board.
You can also download from the location I uploaded:
or:
MicroZed Open Source Linux QSPI Image Tutorial:
Open Source Linux In System QSPI Programming Tutoria:
The MicroZed platform ships from the factory with an example Open Source Linux image stored in the Quad-SPI Flash boot medium. This tutorial builds upon the Zynq Linux SpeedWay training material and describes how to perform in system programming of QSPI Flash partitions to restore the factory Default QSPI Flash contents.
Our Lithium Battery includes 5G Base Station Backup Power System,like 48V 100Ah/150Ah/200Ah Lithium Battery. 3.2V Prismatic cells,like 3.2V 50Ah/105Ah/202Ah Lithium Battery. And Lithium Ion Pouch Cells, including 3.2V 12-30Ah.
Lifepo4 Battery,Lifepo4 Lithium Ion Battery,Lifepo4 48V 100Ah Lithium Ion Battery,Lithium Ion Battery For Solar 100Ah
Jiangsu Zhitai New Energy Technology Co.,Ltd , https://www.zt-tek.com