SDSoC
Zybo Z7
Platform with Linux kernel + root file system
Computer with Linux system
Get OpenCV
You can have at least two options in this step. One is to download and cross-compile the library (docs.opencv.org/2.4/doc/tutorials/introducTIon/crosscompilaTIon/arm_crosscompile_with_cmake); the second is to get a library that has been cross-compiled. . In this tutorial, we have already established OpenCV 2.4.5 in the SDSoC installation folder.
Modify platformHere we need to add the compiled library to the root filesystem of the SDSoC platform you want to use for your project. After this step, the executable (your application) will be able to load the library. The file system image type used in the Zybo Z7 platform is initramfs. If you have another image type on hand, you can get more information on the Xilinx wiki: +and+Modify+a+Rootfs
3.1 Copy the root file system to a temporary folder
Paste the archive copy named "uramdisk.image.gz" in the startup folder of the platform into a temporary folder. Open the terminal and go to the folder.
3.2 Remove the U-BOOT header file to get the CPIO archive
Dd if=uramdisk.image.gz bs=64 skip=1 of=ramdisk.gz
3.3 Compress the new CPIO archive into a newly created folder
Mkdir my_root
Gunzip -c ramdisk.gz | sh -c 'cd my_root/ && sudo cpio -i'
3.4 Copy library and header files (-P save link)
Sudo cp -p /opt/Xilinx/SDSoC/2015.4/SDK/2015.4/data/embeddedsw/ThirdParty/opencv/lib/* my_root/lib/
Sudo cp -r /opt/Xilinx/SDSoC/2015.4/SDK/2015.4/data/embeddedsw/ThirdParty/opencv/include/* my_root/usr/include/
3.5 Compression to CPIO and GUNZIP
Sudo sh -c 'cd my_root/ && find . | cpio -H newc -o' | gzip -9 》 my_ramdisk.image.gz
3.6 Adding a U-BOOT Header File
Mkimage -A arm -T ramdisk -C gzip -d my_ramdisk.image.gz my_uramdisk.image.gz
Here you need to make sure the file permissions are set to 755:
Sudo chmod 755. /my_uramdisk.image.gz
3.7 Replacing a newly created image in the platform
Cp. /my_uramdisk.image.gz /pathToZyboPlatform/boot/uramdisk.image.gz
Create and configure a new project in SDSoC
4.1 Adding an include path
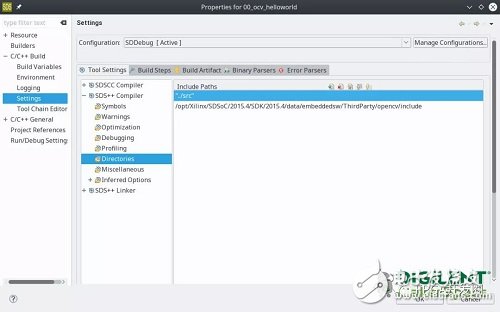
Create a new project, choose your modified platform, and choose the one you want to use for Linux. Right-click the project in the project explorer (left panel) and click Properties. Go to "C/C ++ build" - "Settings" - "SDS ++ Compiler" - "Directory", add OpenCV include path for the selected "build/debug/esTImate configuration" (/opt/ Xilinx/SDSoC/2015.4/SDK/2015.4/data/embeddedsw/ThirdParty/opencv/include), as shown below:

4.2 Link Library
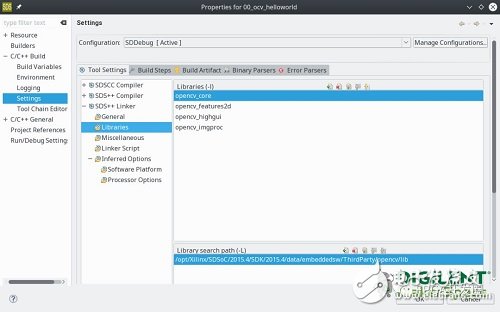
When you're done, go to SDS ++ linker's configuraTIon and under "Library", add the libraries you want to use in your project and where they are located (I am here: /opt/Xilinx/SDSoC/2015.4/SDK/2015.4/data/ Embeddedsw/ThirdParty/opencv/lib)

4.3 Adding -RPATH-LINK
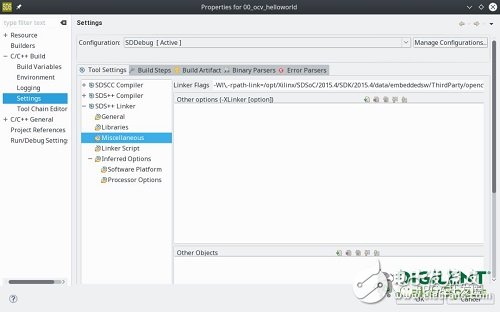
Finally, you need to specify the path so that the linker can search for the dependencies (libs) required by OpenCV. Go to the SDS ++linker configuration and add the following line under "Miscellaneous" - "Linker Flag" (-Wl, -rpath-link = / opt / Xilinx / SDSoC / 2015.4 / SDK / 2015.4 / data / embeddedsw / ThirdParty / Opencv /LIB). The -Wl option indicates to the toolchain the option -rpath-link = . . . Will be provided to the linker.

Here, we are going to do the most exciting part of this article: testing! The following code will perform FAST feature point detection on an image:

Create your program, copy the contents of the "sd_card" folder to the target SD card after completion, don't forget to add a test image in the root directory (friends who are interested in trying, you can click to read the original text, get this tutorial The image source file used).
After the boot operation is complete, run the executable on the target with the following command:
Cd /mnt
. /00_ocv_helloworld.elf Buildings.jpg ocv.jpg
If all goes well, the executable will generate an output image "ocv.jpg" as follows:

We will add the built libraries to the Linux root file system used in the SDSoC platform. Then, we configured a new project based on this new SDSoC platform with the correct inclusion path and links.
Come here, you are free to use OpenCV!
SHAOXING COLORBEE PLASTIC CO.,LTD , https://www.colorbeephoto.com
